
Emerging Threats
Preparedness
Basic M4 Carbine Course - Range 1
Title: Basic M4 Carbine Course - Range 1
Type: Live Fire Range
Time: 4 hours
Venue: 25M Range
Students: 12
Student Equipment: 1 X M4 Carbines per student
3 X 30 round M4 magazines per student
50 rounds ammunition per student
1 X Magazine Carrier
Eye and hearing protection
Instructor Equipment: Range Equipment, Sight Charts/Diagrams, Sight Tools
Assistant Instructors (AI'S): 2 (Names)
PRELIMINARY ACTIVITIES:
Prior to arrival of the students:
- Carry out range opening procedures specific for that range.
- If applicable, inspect weapons and magazines and lay out for issue.
- Set up targets. This activity is often performed by the shooters after receiving the range brief.
- Set up ammunition point, making sure there is adequate room for the number of shooters.
- Set up medical point.
- Designate assistant instructor responsibilities.
- Rehearse any demonstrations to be given.
Upon arrival of the students, issue range brief:
- If applicable, conduct safety inspection of weapons and magazines.
- Review of safety rules, including emergency medical actions and requirement for eye and hearing protection.
- Review of range commands, the emergency ceasefire signal and what to do and actions if a shooter has a problem.
- Explain the range layout and limits.
- Brief the planned range activities, including the training objectives.
- Divide students into firing orders if necessary.
CONDUCT OF LESSON (On range, prior to conducting live fire.)
In this live fire range, Range 1, you will learn how to zero the M4 carbine and you will zero your M4 Carbine. I am the primary instructor (if first time with students, give name and background) and I will be assisted by (introduce the assistant instructors).
No Review
Introduction
EXPLAIN- Zero is the adjustment of the weapons sights so that the strike of the bullet, known as the point of impact (POI), coincides with the point of aim (POA) at a given range. Since adjusting the sights for every range is impractical for most tactical operations, a standard sight adjustment is applied to the rifle for an average range.
It is logical to select the range at approximately the midpoint of the weapon's maximum effective range for this average range. The assumption is that if the point of impact and the point of aim coincide at the midpoint of the weapon's range, then a simple adjustment of the point of aim will allow the shooter to hit all targets within the maximum effective range of the weapon. This type of zero is referred to as the battle sight zero. For the M4 Carbine, regardless of the sights used, correct battle sight zero is when the elevation and windage sight settings enable the shooter to hit his point of aim at 250 yards.
Objective
EXPLAIN- At the conclusion of this lesson, you will understand the importance of zeroing your weapon, how to zero your weapon with the sights fitted and you will zero your weapon at 25 yards for a battle zero.
M4 Iron Sights Zero
EXPLAIN & DEMONSTRATE- The M4 Carbine bullet trajectory rises during firing, crossing the line of sight at two points, once on the bullet's ascent and once during the bullet's descent. This allows the shooter to zero at a range of 25 yards and still have the bullet impact coincide with the point of aim at 250 yards.
The rear sight consists of two apertures and it has a windage drum. The unmarked aperture is for short range distances less than 400 yards. Rotate the sight to the long-range aperture marked with the letter L for distances of 400 yards or more.
Looking through the long–range rear sight aperture, marked with the letter L, the bullet first intersects the line of sight at 25 yards and again at 375 yards. If you use the regular short–range rear sight aperture, unmarked, the bullet's trajectory first crossed the line of sight at 42 yards and then again at 250 yards. Therefore, if you zero the weapon at 25 yards using the long–range sight and then flip the sight to the short–range aperture, the weapon is battle sight zeroed.
To adjust for elevation (up or down), move the front sight post up or down. Adjustments are made by using a sharp instrument or the tip of a cartridge to depress the spring-loaded detent and rotate the front sight post in the desired direction of change. Looking down on the front sight, an arrow and the word UP refer to the bullets point of impact. Rotating the sight post clockwise will raise the bullets point of impact. Rotating the sight post counter-clockwise will lower the bullets point of impact.
To adjust for windage (left or right), rotate the drum, dial or screw clockwise or counter-clockwise. Rotating one click clockwise toward the letter R will move the point of impact to the right. Rotating one click counter-clockwise away from the letter R will move the point of impact to the left.
At 25 yards, elevation or windage, each click will move the point of impact approximately .25 inches or one quarter of an inch. Some aftermarket iron sights may be different, make sure you fully understand how to zero these sights following the owner's manual.
Ask if any questions
M4 Reticule/Optical Sights Zero
EXPLAIN & DEMONSTRATE- There are many different reticule/optical sights available on the market. The basic zeroing principles will apply to all but, it is important to fully understand the specific sight mounted on your weapon. Read the owner's manual, it will give you all the needed information on how to zero and operate the sight. Some optics, EOTech for example, have polarized lens and polarized sunglasses can make the red dot or reticule disappear at various angles.
When viewing through the sight, reticules and red dots should be centered in the tube and the brightness level turned down as much as possible for the light conditions.
Optic sight adjustments are measured in minutes of angle, MOA. One minute of angle is one inch at one hundred meters and at 25 yards it is one quarter inch.
Each click on the sight adjustment dials or drums, on top for elevation and on the side for windage, normally equal the sights minute of angle measurement. For a one-half minute of angle sight, Aimpoint T-1 Micro for example, each click moves the point of impact one half inch at one hundred yards or one eighth of an inch at 25 yards.
Move the dot or reticule in the direction of the desired point of impact. If you want the POI to be more to the right, move the dial in the direction of the letter R, clockwise.
Ask if any questions
Summary
EXPLAIN- Take the time to zero your weapon properly before any other shooting. An inaccurate weapon is ineffective in a gunfight.
Ask if any questions
Look Forward
EXPLAIN- You will now zero your own weapons. If time is available after successfully zeroing weapons and we have ammunition left, you will practice emergency reloading. Load all three magazines with ten rounds in each and move to the 25-yard firing line.
CONDUCT BELOW COURSE OF FIRE
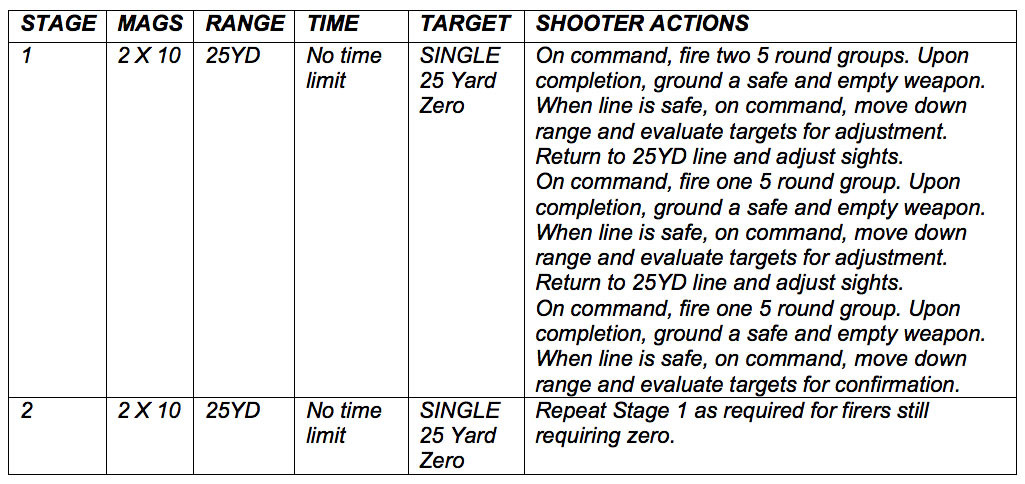
Range Commands
"Shooters, at the 25YD line." Firers move to the 25YD firing line and ready themselves for the next command.
"Ensure you have eye and hearing protection in place." Assistant instructors will scan their shooters and verify.
"The next stage of fire will be the Twenty-five Yard Zero". "You will need two magazines of ten rounds". "If at any time your weapon fails to fire, perform the appropriate drill and get the weapon back into action." "At the completion of this stage, you will ground a safe and empty weapon." The primary range officer will explain the stage of fire.
"Is the down range clear?" All persons on the range will look downrange to ensure no individual is in the danger area before shooting begins. Anyone observing a potentially dangerous situation will immediately raise their non-shooting hand and get the attention of the primary range officer and/or an assistant instructor.
"The downrange is clear." The primary range officer declares it is safe to proceed.
"At the 25YD line, load with a magazine of ten rounds and move to the prone position". Shooters will load and charge their weapons and adopt the prone position.
"Is the line ready?" If a shooter is not ready, they will raise their non-shooting hand, "The line is NOT ready." If the line is ready to proceed, the primary range officer will state "The line is ready, FIRE".
Shooter's fire two (2) five (5) round groups, AI'S will coach firers and correct firing positions where necessary.
"Is all firing complete?" If someone has not finished, they will continue. "All firing is not complete." If the firing line has completed the stage, the primary range officer will state "All firing is complete, you should have grounded a safe and empty weapon."
"Is the line safe?" If the line is not safe, the shooter or AI will immediately raise the non-shooting hand to indicate not safe. "The line is NOT safe." If the line is safe, the primary range officer will state "The line is safe." Shooters can now remove eye and hearing protection if required and carry out instructions.
"Shooters, move forward, evaluate your targets, move back to the 25YD line". Shooters will move to and evaluate their targets for sight adjustment. Shooters will not adjust their sights until everyone is back from downrange.
"Is the down range clear?" All persons on the range will look downrange to ensure no individual is in the danger area before shooting begins. Anyone observing a potentially dangerous situation will immediately raise their non-shooting hand and get the attention of the primary range officer and/or an assistant instructor.
"The downrange is clear." It is now safe to make sight adjustments. AI'S will assist in making sight adjustments. When all have made the required sight adjustments, continue the stage of fire using the same commands.
If this is the final stage of fire for the day, "Standby for a safety inspection." Once the safety inspection has been completed, the primary range officer will state "The range is cold." This means all firing is over and no weapons or magazines are to be loaded.
CONDUCT BELOW COURSE OF FIRE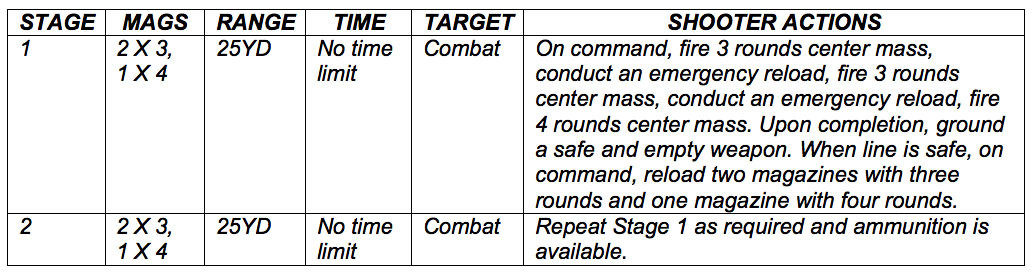
Range Commands
"Shooters, at the 25YD line." Firers move to the 25YD firing line and ready themselves for the next command.
"Ensure you have eye and hearing protection in place." Assistant instructors will scan their shooters and verify.
"The next stage of fire will be the Twenty-five Yard line Emergency Reload Drills". "You will need two magazines of three rounds and one magazine of four rounds in that order". "If at any time your weapon fails to fire, perform the appropriate drill and get the weapon back into action." "At the completion of this stage, you will ground a safe and empty weapon." The primary range officer will explain the stage of fire.
"Is the down range clear?" All persons on the range will look downrange to ensure no individual is in the danger area before shooting begins. Anyone observing a potentially dangerous situation will immediately raise their non-shooting hand and get the attention of the primary range officer and/or an assistant instructor.
"The downrange is clear." The primary range officer declares it is safe to proceed.
"At the 25YD line, load with a magazine of three rounds and adopt the standing position". Shooters will load and charge their weapons and adopt the standing position.
"Is the line ready?" If a shooter is not ready, they will raise their non-shooting hand, "The line is NOT ready." If the line is ready to proceed, the primary range officer will state "The line is ready, FIRE".
Shooter's fire three (3) rounds center mass, emergency reload, fire three (3) rounds center mass, emergency reload, fire four rounds center mass. AI'S will coach firers and correct firing positions where necessary.
"Is all firing complete?" If someone has not finished, they will continue. "All firing is not complete." If the firing line has completed the stage, the primary range officer will state "All firing is complete, you should have grounded a safe and empty weapon."
"Is the line safe?" If the line is not safe, the shooter or AI will immediately raise the non-shooting hand to indicate not safe. "The line is NOT safe." If the line is safe, the primary range officer will state "The line is safe."
"Shooters, reload your magazines with three, three and four rounds." Shooters will load two magazines with three rounds and one magazine with four rounds.
Repeat Stage 1 if required. At the completion of all firing shooters will ground a safe and empty weapon.
"Is the down range clear?" All persons on the range will look downrange to ensure no individual is in the danger area before shooting begins. Anyone observing a potentially dangerous situation will immediately raise their non-shooting hand and get the attention of the primary range officer and/or an assistant instructor.
"The downrange is clear." This is the final stage of fire for the day, "Standby for a safety inspection." Once the safety inspection has been completed, the primary range officer will state "The range is cold." This means all firing is over and no weapons or magazines are to be loaded.
Upon completion of all live fire range training:
- Carry out range closing procedures specific for that range.
- Clear targets away.
- Pick up brass casings.
- Barricades or other range items put away.
- Clean up trash.
- Conduct post training brief and summary.
- If applicable, conduct safety inspection of weapons and magazines.